If you have an old sewing machine that has been gathering dust, then it’s time to bring it back to life! Read the instructions for how to thread an old sewing machine.
Old sewing machines do not have automatic threading & bobbin system. You have to do it manually. But don’t worry the threading process is not very difficult. With help of our guide, you will do it within seconds.
So, what are you waiting for? Let’s Get Started.
How To Thread An Old Sewing Machine – Step By Step
When you’re ready to sew, simply thread the machine by putting all of your materials in their proper places.
Start with a spool on the holder above and then wind up one bobbin at least halfway before attaching it into its slot below where each piece will meet during sewing. Now pull some thread out from both parts (spool & bobbins) so they can catch upon meeting like opposite poles on magnets.
Many vintage sewing machines don’t have a tensioner, which means there is no way to adjust the thread.
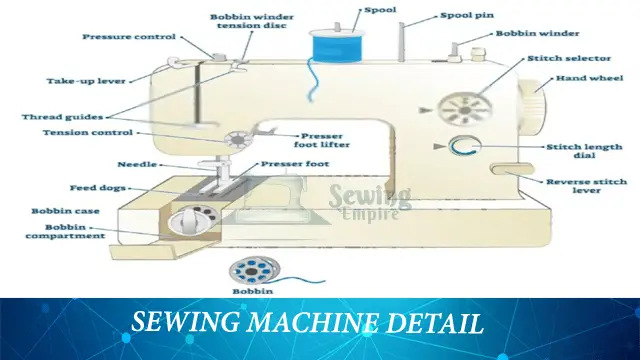
On some of these old models, you can pull out more or less bobbin thread from inside its case so that both threads will meet together and complete a stitch correctly on your fabric surface. Here’s an excellent diagram with instructions on how it works!

The critical parts to know for threading are:
- Spool pin
- Thread guide
- Tension disc
- Tension spring
- Thread take-up lever
- Thread guide at the front of the machine
Here’s what you need to do:
Step 1
Place the spool onto the spool pin.
Step 2
To thread the needle, turn the balance wheel until it reaches its highest point or is close to being at a right angle. This will simplify things for you since there’s less space between your fingers and where you’re trying to insert the thread into on top of that housing.
Step 3
Starting from the side closest to the wheel, thread your spool of ribbon through a hole in the top part of the machine.
Step 4
To decrease the tension of a sewing machine, pull on the thread from above and then roll it around the metal rod under the spring.
Step 5
From the spring, thread your way under and through until you reach a second guide. Then pull it down towards the needle before going downstream to run in place.
Step 6
The best way to ensure that your needle and bobbin thread will catch is by manually turning the wheel. It’s a bit time-consuming, but it’ll be worth it in the end! Just pull on an extra little piece of each so you can work with them without having too much excess hanging around.
Finally, run the thread through both needles as shown before starting any stitching – this ensures no tangling or knotting later!
To make sure you’ve done this correctly, move down slowly using manual power – if proper stitches are made then job well done; otherwise, follow the next step where all necessary tips for successful sewing machine operation have been provided including how to wind bobbins properly, etc. For making life easier from now onwards.
How To Wind A Bobbin On An Old Sewing Machine
If you’ve looked at some of the other sewing machine reviews on this site, newer machines have automatic bobbin winding mechanisms. Older machines didn’t have that feature but it’s really easy to wind a bobbin yourself!
Start with a spool of thread on the spool pin and remove your bobbin from the machine. Then start winding your thread around until taut; no need for fancy tools or gimmicks here!
You can spin the bobbin quickly and start wrapping thread around it by inserting a pen or something similar through its center. Once sufficiently wound, place it in your bobbin case and pull out the thread from its guide carefully.

Robert Patricia
Robert Patricia is a data analytic and content creator. He has worked extensively with large data sets to glean insights for both public and private sector clients. He has used this knowledge to create compelling content for brands across the internet. Albert also enjoys creating content for websites and social media. He is an expert at creating catchy headlines and understands how to capture the attention of readers.
