Older vintage machines are virtually indestructible, but newer ones have many more plastic parts and a much shorter life.
However, the old machine’s effectiveness can be extended with simple maintenance.
I will show you how to maintain your sewing machine so that it lasts longer than ever before!
If you’re lucky enough to get your hands on a vintage sewing machine, it’ll probably last longer than any modern sewing machine. This is because of the unique features and mechanism that makes them so easy to fix and keep running for decades!
- Tools You Need To Service A Sewing Machine
- How To Service A Sewing Machine
- Step 1. Removing Fluff and Dust
- Step 2. Checking The Bobbin
- Step 3. Lubrication
- Step 4. Checking The Tension
- Step 5. Checking The Bobbin Winder
- Step 6. Checking The Electrics
- Step 7. Checking The Timing
- Some Last Words
Tools You Need To Service A Sewing Machine
There are many tools needed to fix your knitting needle. You’ll need a screwdriver in varying sizes, usually found at hardware stores and sewing supply shops; an eyeglass repair kit’s small size is recommended for its precision.
A towel or rag can get dirty when fixing the machine so it shouldn’t be too nice either! Lastly, you will use lubricant from most fabric stores & sewing machine repair shops with Singer brand being preferred liquid squirt bottles are not advised but up to individual preference
- Scissors
- Small pliers (you might have these already if they’re part of a multi-tool)
- Some sort of wrench that fits over the bolt on top where all those screws came out
- Tweezers
- You can use old makeup brushes or paintbrushes to clean your sewing machine. You may also want a special cleaning brush for this purpose, which you can buy from any of the stores listed above. If that is too expensive though, remember that an ordinary toothbrush works just as well!
How To Service A Sewing Machine
Follow the following steps on How To Service A Sewing Machine, step by step for good results:
Step 1. Removing Fluff and Dust
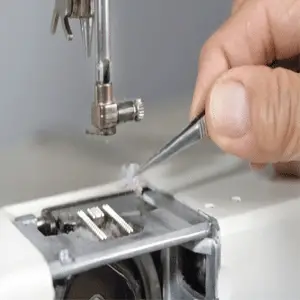
In order to clean your machine, you need to remove dust and fluff.
This is most commonly found between the feed dogs on a needle plate which can be removed with one or two screws depending on what type of machine it is.
You can pick out matted-up pieces using either a pin or brush and a vacuum cleaner crevice tool if necessary.
To fix the problem, you may need to use a can of compressed air or simply blow it out.
But be careful not to just push any fluff further into the machine because that could cause more problems in the future.
Also, look for pieces of the broken needles that might have ended up here and get stuck inside which will jam everything again if they’re not removed.
If there are no parts caught by needles nor dust anywhere else on your machine’s threading path between discs under the tension adjuster, then good quality threads should work best since they don’t shed as much compared with cheaper brands where things like this tend to happen often leading them getting jammed over time too!
When changing the needle, make sure to check for any roughness. If there is no visible damage or you can’t fix it yourself with fine emery paper, then replace it as soon as possible because a bent needle will cause nothing but trouble.
Step 2. Checking the Bobbin
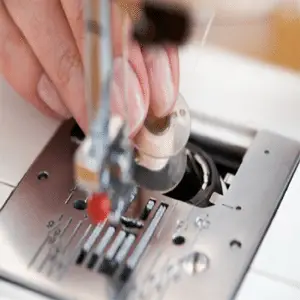
In vintage machines, the bobbin is sometimes accessed by sliding away from a plate next to the needle plate.
This can be found in modern front-loading and top-loading machines as well.
In older models, however, this mechanism was different because it used an entirely bullet-shaped device that moved with each stitch through a looped upper thread.
A vintage sewing machine has a wooden base to support it in the horizontal position, so you can access all of its parts.
When I took out my bobbin case and removed the dust using an air compressor, it fits perfectly into place on top of this stand upright. The whole setup is really neat!
The bobbin case holder has a sharp point known as the hook, designed to catch both upper and lower threads to engage them with each other. Run your finger over this, smooth off any burrs if necessary, then reassemble it properly.
If you are buying second-hand machines make sure that all bobbins match; there are several types of superficially similar ones which will cause problems if they work at all.
Step 3. Lubrication
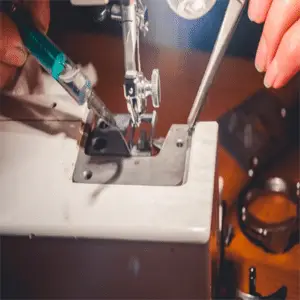
If you’re working with a modern plastic machine, then more screws and clips may get in your way.
But don’t worry; just probe the cracks between them with tools like spatulas or knives to determine where they are.
Make sure not to insert it too far or damage any of the parts!
Using a credit card, plastic prying tool, guitar pick, or anything similar in the gap so created to prevent re-engaging while you probe for the next one can help release stubborn refusal.
If that doesn’t work there may be another screw hidden under the rubber foot or label.
Gently turn the handwheel to see which parts move. If any part moves, you need oil on its bearings or sliding surfaces unless it’s nylon gear, wheel, or cam- these are greased for life.
Use only sewing machine oil and wipe away excess before it has a chance to drip so that nothing is too oily!
If a vintage machine has been out of use for a long time, it may be very stiff or have seized up completely. Oil the mechanism thoroughly (but wipe away any excess) and leave it to penetrate until smooth operation.
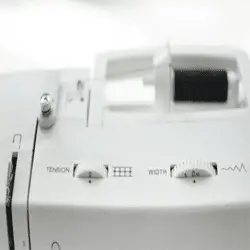
Step 4. Checking The Tension
A good way to check your bobbin tension is by suspending it with a thread and giving it a little shake. If the bobbin moves around, you might need to adjust its settings with this screw here in order for proper results!
Step 5: Checking The Bobbin Winder
Examine the bobbin winder. This often engages with the handwheel by means of a wheel with a rubber tyre that is worn or cracked or perished, replace it. Spares are generally easy to obtain for this part so they can be replaced easily if needed at any time.
Once you’ve done your research and identified what replacement parts might need replacing on your machine, try winding a bobbin!
Make sure there’s enough tension in the thread itself not too tightly wound but also without being loose as well because then it will cause trouble later when sewing something up using those bobbins.
Step 6. Checking The Electrics
Making sure your machine isn’t still plugged in before touching any of the electrics is important for smooth operation. The pedal may need lubricating, or it could just be that there’s a rheostat wired into an older model.
Newer machines will likely have similar variable speed controls to dimmer switches on lights instead of separate pedals with resistance settings like old sewing machines do.
Examining the foot pedal is your first step to taking it apart. Use only light lubricating oil, not sewing machine oil for this part!
You’ll need grease on sliding parts and keep all of it away from electrical contacts. Also, check whether or not the motor belt tension needs adjusting by tightening screws/nuts in its bracket if needed – you may have to replace brushes or clean out the commutator depending on how well the motor runs now.
If the motor bearings seem to need lubrication you should use grease specially intended for electric motors, preferably as recommended by the manufacturer. A replacement bulb is easily fitted on older machines but may be wired in and not so easily changed on newer ones.
Consider replacing a filament bulb with an LED equivalent which will run much cooler; however, if it needs to shine mainly downwards but LEDs in your new LED look sideways take this into account when buying one that fits properly.
Step 7. Checking The Timing
If you are noticing unexplained broken threads, it could be that the timing needs adjustment. This may require a professional with the appropriate service manual and is not something I can cover in this Instructable; however, we’re going to see if we notice any problems ourselves! To do so:
-Turn your machine on its side
-Remove the bobbin and plate holding carrier
After the hook passes the needle, it will rise up to 3/16 of an inch.
You should see the thread drawn around the bobbin so as to make a stitch. At this point, you will continue turning until it reaches its position and starts stitching properly!
If you’ve decided to return and fix the machine, search online for your make and model of the sewing machine with “timing adjustment” appended. You should be able to get a sense of how it works by looking at diagrams or videos on YouTube.
At this point in time, manufacturers don’t usually provide manuals anymore; they’re more likely than not available online if you can find them.
The purpose is that one has come far enough into fixing their own machines that they would like some help adjusting timing (the specific term used was replaced).
Some Last Words
Let’s hope your machine is doing well after getting to know it better. Hopefully, you have overcome the fear of looking into a very intricate and ingenious mechanism. You should now be enjoying good quality time with this purring cat that has had its fill!

Robert Patricia
Robert Patricia is a data analytic and content creator. He has worked extensively with large data sets to glean insights for both public and private sector clients. He has used this knowledge to create compelling content for brands across the internet. Albert also enjoys creating content for websites and social media. He is an expert at creating catchy headlines and understands how to capture the attention of readers.
